Friday, May 27, 2011

How We Built Our Tiered Raised Bed Vegetable Garden on a Slope


When we bought our house and saw the slope in the backyard, we knew we had some challenges ahead of us. The yard extended about 15 feet out at grade, and then the slope began. We wanted to plant a vegetable garden, but we were not sure how to do that on the slope. For the first two years, I planted only tomatoes in a small bed on the slope which receives a lot of sun.

Now and then, we discussed how we wanted to build some garden beds. We did not want wood because it would not last long. We would have used cedar which would last quite a while, but we wanted something a little more permanent. Eventually, we discovered some retaining wall stone at Home Depot that seemed perfect for the job. These are made by Pavestone® and they have a lip on the bottom back which helps to hold them in place. Since we did not want to mortar our garden beds, these building stones seemed like a good choice.

Upside down paving stone with lip on bottom
After doing some research, we decided to build our garden. Although I helped my husband with some of these tasks, he is really the one who built these beds. After doing a couple of them, he became very proficient at it.

To get the beds to grade we needed them to be about two to two and a half feet high, and we decided to make them about five feet wide and about three feet deep. Sometimes those measurements varied as the hill grade changed. At first, we decided on four beds. However, we later realized we needed at least two more for a total of six beds--three on each side.

Each bed is about two to two and a half feet tall
Tools needed:

Level
Rubber Mallet
Sand
Crusher run or crushed stone
Pea Gravel
Pavestone® AnchorWindsor Stone®
Shovel
Garden Trowel
Hammer
Chisel

To begin, we dug a trench about the height of the stone to lay the first row at the bottom (down the slope) of the bed. Digging in the first row adds stability to the bed. We spread a thin layer of sand over the trench and then spread the crusher run or crushed stones. We laid the stones in the middle of the first row and worked our way around, using the level to make sure each stone was level. We used the trowel to adjust the sand and crusher run/crushed stone to level the stones out. After placing each stone, we used the rubber mallet to secure it in place.

The first row is placed in the trench to add stability for the stones above.
Once the few stones are in place at the bottom of the bed, we began working our way around the bed. The hill guided us as to when to start the next row. The first row does not go all the way around the bed because of the hill grade. After the first row, things became a bit easier because only a few stones need to be dug in as they meet the sides on the slope. The remainder of the stones are stacked on other stones. We staggered the stones by placing the center of a stone over each joint for stability.

The rows meet the slope, and then the next row is laid.
After the first bed was completed, the remainder of the beds in that row came up to meet the first bed without going all the way around as the first bed did.

The first bed's top row encircles the entire bed, but the beds down the row meet the bed before it.
We dug out some of each bed, and then spread pea gravel against the first row of stones for good drainage.  Then, we filled each bed with soil, compost, humus, and manure. The instructions from the manufacturer suggest spreading landscape fabric around the inside against the stones to prevent soil from escaping through small openings. We did not do this, but we may do it in the future. We have not really had a major problem with soil escaping.

We laid some gravel against the first two rows for better drainage and then backfilled with soil, compost, humus, and manure.
As we came around the rows setting the stones, there were times when the stones did not fit. We had to cut a few to make them fit. We used a chisel and hammer to mark where we needed the cut, and then hammered off the excess. Sometimes the stone broke at the cut, and sometimes we had to shape it a bit with the hammer.

The third stone from the end is a cut stone.
Given that we have this slope, I cannot say enough about how much I love these garden beds. They have extended our yard so we can have a vegetable garden. The beds are easy to work in and around, and they have held up without incident for four years now. Last year, we placed pavers in between the rows because sometimes the hill is slippery. And this year, we hope to create a path and a fence all around the garden because rabbits are frequent visitors.

For more information, the manufacturer, Pavestone®, has some building instructions on their site.

I am linking up with My Romantic Home for Show and Tell Friday.
©Michelle A. Potter

Friday, May 20, 2011

Tomato loves Parsley, Cabbage loves mint - All About Companion Planting


Chives
Native Americans practiced companion planting early in their history by planting corn with beans. Beans fixed nitrogen into the soil for the heavy-feeding corn, and the cornstalk provided a sort of trellis for the pole beans to climb. They added squash to spread along the ground to prevent weeds. Squash, beans, and corn complete the Three Sisters method of gardening developed by Native Americans. Nobody knows where companion planting originated, but there is evidence of its use as far back as in ancient Rome.
Herbs - Parsley, Oregano, Basil
Companion planting is a method of gardening where plants are planted together for several beneficial reasons. Some plants provide pest protection or deterrence for others. Other plants are planted as insect traps to protect the most desirable vegetable plant. And some plants feed other crops while others improve growth and flavor next to certain plants. For instance, basil improves the growth and flavor of tomato.

Companion planting as interplanting crops helps to confuse pests by hiding their host plants. Herbs intermingled with vegetables helps to produce odors that may deter some pests and confuse others. Some plants attract beneficial insects that help to control unwanted pests.

Below is a list of vegetables and their companions:

Asparagus - Tomato, parsley, basil

Bean - Potato, carrot, cucumber, cauliflower, cabbage, summer savory, rosemary

Beet - Onion, kohlrabi

Cabbage Family (broccoli, Brussels sprouts, cabbage, cauliflower, kale, kohrabi) - Potato, celery, dill, chamomile, sage, thyme, mint, pennyroyal, rosemary, lavendar, beets, nasturtium, onion (Thyme deters cabbage worm.)

Carrot - Peas, lettuce, chives, onion, leek, rosemary, sage, tomato, dill (Carrots release a fluid into the soil that is beneficial to peas.)

Celery - Leek, tomato, bush beans, cauliflower, cabbage

Corn - Potato, peas, beans, cucumber, pumpkin, squash

Cucumber - Beans, corn, peas, radish, nasturtium, sunflower

Eggplant - Beans

Leek - Onion, celery, carrot

Onion - Beet, strawberry, tomato, lettuce, bean, summer savory, chamomile

Pea - Squash

Pepper - Carrot, eggplant, onion, tomato

Peppers with Onions
Potato - Horseradish, bean, corn, cabbage, marigold, eggplant (as a trap crop for potato beetle)

Pumpkin - Corn

Radish - Peas, nasturtium, lettuce, cucumbers, chervil

Spinach - Strawberry

Squash - Nasturtium, corn, borage

Strawberry - Bush beans, spinach, borage

Tomato - Chives, onion, parsley, asparagus, marigold, nasturtium, mint, carrot, borage, bee balm, basil

Mint

The following combinations may cause problems:

Hyssop inhibits growth in radishes.

Rue and basil do not like each other.

Garlic, onion, and shallot stunt the growth of beans and peas.

Pole beans and beets stunt each other's growth.

Dill retards growth in carrots and tomatoes.

Kohlrabi stunts growth in tomatoes.

Tomatoes and corn are attacked by the same worm.

Tomatoes and potatoes are attacked by the same worm and the same blight.

Do not plant strawberries with cabbage or cauliflower.

Sage can be injurious to cucumber.

Fennel does not grow well with other plants.

I have been companion planting since I began organic vegetable gardening. I do not have any definitive proof that it works, but I usually do not have many insect pests in the garden--not enough to really mention. And everything tastes very good. I would rather plant this way to try to keep my vegetables healthy than not. It seems to make sense that planting one crop together in a bed would attract insect pests more easily than intercropping with other vegetables and herbs. I have not tried it on a large scale, but I have heard of some gardeners who place their vegetables in their flower beds for the exact same purpose--to confuse and deter insect pests.
©Michelle A. Potter


Sunday, May 15, 2011

Raindrops on Blooms - May GBBD

Double Impatiens
 
Blogger had some technical problems last week which prevented me from posting, and I lost some comments on my most recent post. I believe things have stabilized a bit now, so here goes...

It is Garden Bloggers' Bloom Day over at May Dreams Gardens, and I thought I would participate this month because the garden is so rewarding at this time of year with all the blooms and fragrances. After such a strange winter and early spring, the weather seems to be getting back to normal. I think the rain we had early in the spring has boosted all the garden plants. The roses are looking so full of foliage and blooms. And when I walk by them, the aroma is heavenly. There were so many rose blooms, I cut some and put them in a vase. Not only is the color beautiful in the house, the aroma is permeating the adjacent rooms.

Knockout Roses

St Joseph's Coat Climbing Rose

Clematis blooms are coming out and decorating the garden with their various colors.

Nellie Moser Clematis

 Blue Light Clematis

Jackmanii Clematis

Recently, I visited a local garden tour and picked up some yellow mandevilla, but I have red blooming in the garden now.

Mandevilla
 
 
Yarrow is such a nice plant in the garden. It has interesting foliage and beautiful blooms. I have several colors in the cottage garden, but this is a red variety.

Yarrow

Irises are in bloom in several areas of the garden. I have them interplanted among other perennials in different beds. I like the look of their straight leaf stalks among some of the feathery or lighter foliage of other perennials. However, on the garden tour I visited recently, (and I was very disappointed that I forgot my camera because I wanted to share it :( ) one of the gardens had an entire bed of irises of various colors that must have spanned 15 to 20 feet. It was stunning. I may try creating an entire bed of irises one day, since they multiply so quickly.

 Iris Los Coyotes

Iris Caribbean Deep

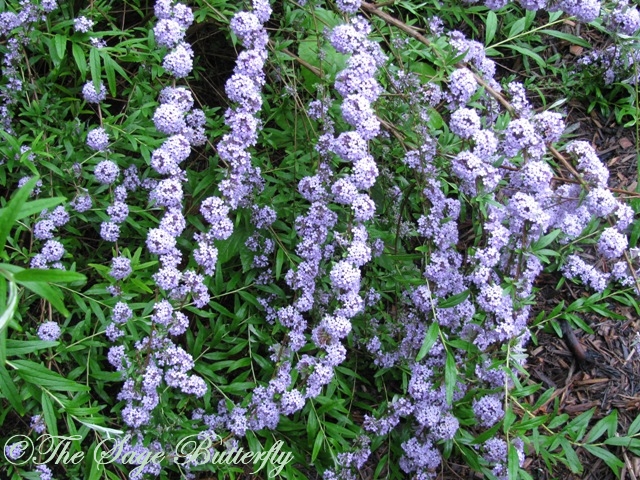
One of my butterfly bushes is a variety that only blooms in the spring, but what a display.

 Buddliea alternifolia

Buddliea alternifolia

And here are some other bloomers in the garden.

Salvia

Pelargonium

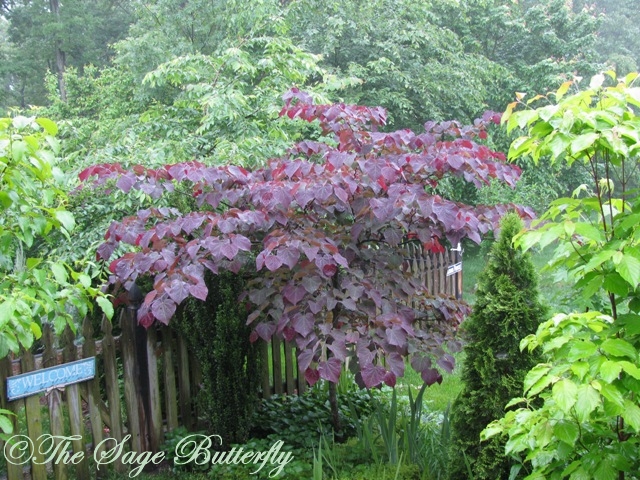
Some of the trees are looking so lush and colorful without blooms.

 Redbud, Forest Pansy

 Weeping Japanese Maple - Green Lace Leaf

Japanese Maples in green and red

Indoors there are a few things blooming...

Orchid Cactus - Epiphyllum

Phalaenopsis Orchids

 Desert Rose - Adenium

African Violet

The ice plants are budding and should bloom soon. And some hydrangeas are budding and some are setting buds. The hydrangea below is one I bought to replace one that I lost during some construction in the yard. It makes me very anxious for those hydrangea blooms.

 Ice Plant

Endless Summer Hydrangea

Check out all the other blooms from other garden bloggers at May Dreams Gardens. Happy gardening!
©Michelle A. Potter


Friday, May 6, 2011

Blooms, Color, and a Vegetable Garden - Fertilizer Friday

Tootsie Time is hosting Fertilizer Friday. Because things are beginning to bloom and grow, I thought I would document it and share it here. Most plants have more foliage than blooms at the moment. Here is what is blooming and growing in my garden:


Here is what we call the sunny cottage garden because it receives a lot of sun. Not much is blooming yet. The roses, irises, and primroses are about the only blooms. Two Carolina Jasmine plants are climbing the arbor. They were blooming a couple of weeks ago.

I put this azalea in the garden about seven years ago, and the last two years it has really done very well.

The red blooms stand out against the backdrop of other plants in the garden. I probably need to thin out some things.

Coreopsis (We have not finished mulching yet...hence the bare soil.)

Various plants in the cottage garden...salvia, chives, lamb's ears

My Joseph's Coat rose is quite young, but the blooms are a lovely multi-colored hue.

Every year, I plant these hanging planters with pelargoniums. This year I found some that are a very deep red. The variegated ivy has not quite yet begun tumbling down.


These primroses really are on the edge of a path and in between the stones. We try to avoid stepping on them, but, no matter what, they come up with vigor.

These are Knock-out roses. I really like their reliability and vigor.

Here is another spot where I have Knock-out roses.

Here is the vegetable garden. We have a large hill in the back, so we built a tiered vegetable garden. Currently in the garden are green bell peppers, Thai chile peppers, scallions, dill, cilantro, mint, chives, oregano, basil, rue, thyme, kale, broccoli, chard, bush beans, pole beans, cilantro, parsley, tomatoes, bush cucumbers, red leaf lettuce, arugula, romaine lettuce, spinach, squash, strawberries, asparagus, and zucchini. Soon, it will be too warm for the cool weather crops. I will most likely plant some okra and more beans in those beds. I placed a very large arbor in the bean garden for the pole beans. Everything I have tried was never tall enough. We'll see how this one does.

What do you have growing or blooming in your garden?
©Michelle A. Potter


Related Posts Plugin for WordPress, Blogger...
ondragstart="return false" onselectstart="return false"